Monday, December 25, 2006
Thursday, December 21, 2006
Sunday, December 17, 2006
Tuesday, December 12, 2006
Invasion of the Thingies

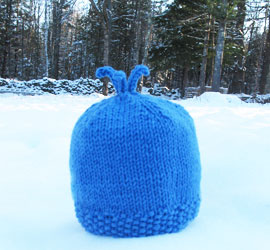
With an almost eerie nonchalance, the thingies creep into the most innocent of projects: a baby cap. Alien thingies firmly sprout from the top. How does it happen? When does it happen? Most of all, why does it happen? My guess is it suits the recipient or in this case, his parents, who are, most definitely thingy people, (and I mean that in a good way) ... so when you're not really paying attention... there they are, on top.
Baby Thingy Cap
I used 1 ball of Samoa, from GGH, 50%cotton, 50% microfiber: 104 yds/50g, I think the color is 56 but I lost the ball band...Cambridge blue. It's a nice and springy yarn, but tends to show every pause in your knitting, don't sweat it, it'll even out with blocking and wearing.
Size: infant/toddler, 16" circumference.
Gauge: 16sts and 14 rows= 4"
Needles: 16" size 4 and 5 circular needles, 1 set size 5 double pointed needles and if you’re fussy 1 set smaller dp needles, say 4 or 3 for the thingies.
Notions: stitch markers, tapestry needle
With size 4 circular needles cast on 64 sts. Join w/o twisting. K in Pearl Stitch (Row 1:k1, p1; Row 2: p1, k1) for about and inch, 5 or 6 rows. Increase row; with size 5 needle, k, increasing 6 sts evenly around (70 sts). Continue in stockinet st (k every row) for about 3.25 inches. Set up for double decreases: * k13 Place Marker (PM) k1, PM*, repeat between *'s 4 more times. This marks off the stitches that you will be making double decreases on either side of, for a nice 5 pointed star top (reminding me of Dr.Seuss's Sneeches, with stars upon thars); as follows: ** k2 together, k to with in 2 sts of marker, slip slip knit; slip marker, k1, slip marker**, repeat between **'s 4 more times. K 2 rows, repeat Dec row, twice. K1 dec row, k1 row stockinet until 10 sts remain. Now I like the I cord for my thingies to be just 3 sts, and I just wanted 3 on this hat, so I knit 2 together and then k 2 (for 3 sts on needle) and launched into the first thingy. Make 2 more I cords with the remaining 6 sts. On this wee hat the I cords are about 1.5" long. Fasten off and weave in the ends.
After you make one why not make one to give away? Save the Children has an Action Kit which will tell you how. While you're in the true mood of the season, visit The Scent of Green Bananas, one of my favorite food blogs and follow the links for Menu For Hope.
Friday, December 08, 2006
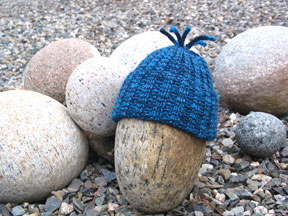
Thingy Hat
This is the hat I traded for garlic. I love to trade. I don't really enjoy specific commands on my knitting, however. The garlic farmer wanted "thingies" on the top of his hat. I don't generally do thingies. Some people are thingy champion masters, constructing a whole career out of doing thingies, and doing it beautifully and artistically and interestingly.... I just don't really do them myself, I leave it to the Thingy Experts.....After all that, I do rather like my wee touch-of-thingy on this classic watch cap. I hope the farmer does.The yarn is called Friendz Blendz. It is hand dyed, 50%mohair and 50%wool; 200yds/3.57 oz.; color TN-2; from Friends Folly Farm out of Monmouth, Maine. It is deliciously soft and machine washable to boot!
Wednesday, December 06, 2006
Fresh Shrimp

It is a happy day when the shrimp trucks are out. The cheery red lettered signs announce one of the most sweet and succulent gems of the sea: Fresh Maine Shrimp. In our family we cook them all kinds of ways, from gumbo to crepes, but by far everyone's favorite is the easiest to prepare.
We toss the whole shrimp in olive oil, salt and pepper. Let them soak while we fire up the grill and just put 'em on when its hot! Turn them once and serve.
Everyone peels their own. It is messy so provide dishtowels for napkins. A big bowl of shrimp, a bowl for shells, a salad and bread or rice, and voila! Dinner!
This year we're able to grill right in our kitchen, not a snowbank outside. Our Vermont Castings stove (Uncle Henry's free for the taking) opens right up front, making it easy to accommodate a grill. It's fun to tend the shrimp over the glowing coals, comfortably perched on a 3 legged stool.
Sunday, December 03, 2006
Tools of the Trade
These are my tools. Sketch book, a graph paper book, a mini-graphpaper-Moleskine and a post-it note. Missing is a pencil with a good eraser.This week all my spare time has been spent trying to figure out why I can't post from home anymore, or just occasionally. Hate'n it! My time would have been better spent knitting.
Tuesday, November 28, 2006
Tie One On

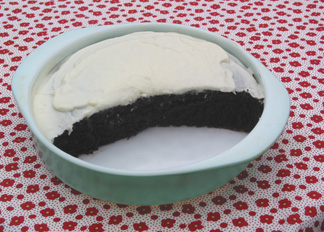
My cute apron is just the ticket for a gloomy day. Guaranteed to cheer me up, even today, with wonky blog-posting troubles and the first snow of the season. My thing to whip up while wearing the apron is Crazy Chocolate Cake.
When the holidays are over and there are no eggs or butter in the house, this cake comes to the rescue! The best part, since it is mixed in the pan, there's not much to clean up!
Crazy Chocolate Cake
Preheat oven to 350
1 1/2 cup flour

1 cup sugar
4 tablespoons cocoa1 teaspoon soda
1/2 teaspoon salt
6 tablespoons vegetable oil
1 tablespoon vinegar
1 teaspoon vanilla
1 cup cold water
Sift dry ingredients into a 9" cake pan. Make three holes in dry ingredients. Pour 1/3 of each liquid (except water) in each hole. Pour water over all and mix with a fork until smooth. Bake for 30 min. Top with frosting of your choice, but its also good plain.
Monday, November 27, 2006
Apologies

I've been having big trouble with Blogger and haven't been able to use Firefox, which has all the Bold and italics and picture options. Not to mention a groovy, handy dandy links ability . I used Safari for the 1st Mitten Post, then when I tried the Pattern it wouldn't work so I resorted to Internet Explorer which won't allow me any pictures. When I get it sorted out (cross your fingers) I'll re-post with the original layout and easy to read pattern...Sorry!
Instant Mittens

Instant Mittens
Aka: Stash Busters
Finished Size: Womens Small, Womans Medium, Womans Large,(9.5 “[24cm],10” [25.5 cm],10.5”26.5cm])
Yarn: 100-ish yds of each of 2 yarns of your choice ***, to roughly equal a bulky weight yarn.
Needles: 1 set size 9 dpn
Notions: marker; stitch holder; tapestry needle
Gauge: 14sts and 20 rows=4” [10 cm]
Mitten (make 2)
With 2 strands of yarn cast on 28 sts. Arrange sts evenly onto 3 dp needles, place marker and join taking care not to twist sts. Work in k1 p1 ribbing for 15 rnds or 3” (7.5mm). K 10 rnds (2” [5m]) in Stockinette stitch (knit every rnd).
Divide for Thumb Opening: Slip first 4 sts onto a holder, cast on 4 sts, knit to end of rnd.
Body: Continue in St st until piece measures 1.5” (3 cm) less than desired length (about 8’[20 cm] for WS, 8.5’ [21.5 cm] for WM, 9” [23 cm] for WL).
Shape Top: 1st dec rnd: k2 k2tog around. K next rnd. 2nd dec rnd: k1 k2 tog around. K next rnd. 3rd dec rnd: k2 tog around. 4th dec rnd: k2tog. Cut yarn and draw tail through remaining sts. Pull together tightly and fasten off.
Thumb: Slip the 4 sts from holder onto a dpn. With second dpn pick up 6 sts from around thumbhole. Arrange sts evenly on 3 dpn. Place marker and join. K until thumb measures 1” less than desired length (about 10 rnds or 2” [5 cm] for WS, 12 rnds or 2.25” [5.5 cm] for WM, or 14 rnds or 2.75” [7cm] for W L). 1st dec rnd: k1 k2tog around, end k 1 (7sts). K next rnd. 2nd dec rnd: k2 tog around. Cut yarn and draw tail through remaining sts. Pull together tightly and fasten off.
Finishing: With tapestry needle weave in all ends.
So go at it! Attack the stash or visit your favorite yarn shop and check out the sale bins, or buy just one skein of that luscious mohair you've always wanted to use.
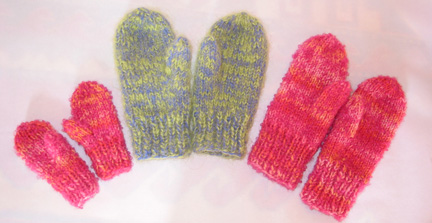
***Yarn Note For my blue green mittens (center) I used 1 skein Bartlettyarns, Lake Blue (4 oz, 200yds), and 1 skein Ironstone English Mohair, Color 725 (2oz,125yds). The balls above are what I had left. I seem to remember using Classic Elite Le Gran Mohair which has only 90 yds in a ball. In fact the germ of these mittens was from freebie pattern that I think used that yarn....I use any old yarn, if you are a relaxed sort like I am and you seem to be running short of something, you can just add a stripe of some other color and call it a design choice.
The beautiful pink version was made from plyed homespun and commercial boucle, spun, dyed and plyed by the "sadly blogless Tracy". She once made me a fabulous mile long (really) narrow scarf that I wore till Isadora Duncan issues prevailed and I wound it into a ball, awaiting the perfect moment.
For more yarn tips check out the post below, Eleventh Hour Mittens.
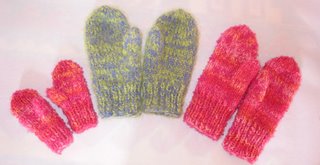
A new embellished, embroidered version can be found here: Embellished Mittens.
Eleventh Hour Mittens

Whew, did the holiday whirl you into a different world? Ours was travel and storms and food and fun and fear and angst and exhaustion and surprises and happiness. And more food! I squeezed in what little knitting I could, working on these mittens which can be put down and picked up again without much fuss. I use 2 strands of yarn from my stash held together to produce a bulky or chunky weight. I think having one strand of mohair is the most forgiving, allowing one to race along with abandon, never worrying about even stitches. Each mitten is made the same with almost no shaping.
I always have some yarn lying around that I am at loss when it comes to using it. Lime green mohair for instance, unless I'm transported back to CBGBs in 1979 I don't think I really want to wear a garment made out of it, but it was too irresistible to let languish in the sale bin (maybe I will want to look like Cheetah Chrome sometime soon)... Then I've got odd balls of this and that, not enough to really make much of anything. These are just the materials for Eleventh Hour Mittens. You can mix it up with wonderful results, someone will love them. You don't have to worry too much about gauge, someone will fit them.
To begin, I'll give you the women’s sizes. They are easy to modify yourself after you've knit a pair. I'll try and get the child sizes up soon and also the mans pair I'm working on.
Tuesday, November 21, 2006
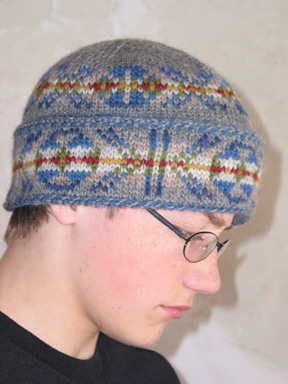
Fair Isle ?
I am planning to give you all a simple last minute gift pattern, however the camera has gone missing. I think I know who might have it in his backpack. Which is at school.So for variety I offer a view of this fair isle hat. Some of you may notice it's similar to Fair Isle 101
from Interweave Knits Winter 2005 issue.
I have lots of Heilo from Dale of Norway, I love it and collect it, so when faced with a gentleman who wanted to make sure his ears were warm, but wanted fair isle patterns, I came up this "foldy" hat. Many layers of warmth.
About the term fair isle knitting, I'm with Nancy Bush and the rest of the crowd who believe it should only be descriptive of the traditional 2 color knitting originating in Fair Isle, one of the isles of Shetland. Unfortunately, in the wider world it has come to mean any colorful stranded knitting. Pick up any magazine or catalog, even ones geared to knitting and you'll see the term used this way. I've resigned myself to this. I wish it could at least be refined to mean only 2 colors in a row....But I guess anything is better than the latest Urban Outfitters catalog where "fair isle" knitting is called intarsia!
Stay tuned for a free and easy pattern, perfect for the holiday rush!
Subscribe to:
Posts (Atom)